Apple Crumble

Sunday, March 27, 2011

APPLE CRUMBLE

Apple crumble is a yummy dessert which can be easily prepared in no time. Tastes delicious if savoured warm. It makes an excellant hot and cold two in one dessert when served along with ice cream.


INGREDIENTS

Fresh and firm apples - 2
Lime juice - 2 drops
Sugar - 2tbsps ( or 3tbsps if you have a sweet tooth )
Cinnamon powder - 1/2 tsp
Plain flour - 4 tbsps
Butter - 2 tbsps

Method

1. Wash, core and dice the apples with the peel intact.
2. Mix the diced apples with lime juice.
3. Mix half the quantity of sugar and 1/4 tsp of cinnamon powder with the apple.
4. Line an oven proof dish with this fruit mixture.
5. Mix plain flour with the remaining sugar and cinnamon powder.


6. Rub in cold butter into the flour mixture till it resembles bread crumbs.
7.Shower the apple mixture evenly with the flour crumbs.
8. Bake in a pre heated oven for 25 minutes at 180 degrees C. Time to switch off the oven when you get a pleasant aroma of cooked apple.


If you prefer a brown topping, grill the apple crumble for 2 minutes after baking, taking care not to burn the dish.


Apple crumble can be relished as it is or with cream or ice cream.
READ MORE - Apple Crumble

Jacket Potatoes with mixed Vegetable Stuffing

Sunday, March 6, 2011

What better dish to revive our blog with, than with an all time endearing jacket potato recipe! My ten year old niece loves restaurant style foods, and is always excited when we try making the same dishes at home. She recently tasted a jacket potato at a Mexican eatery and totally loved it, although she could not eat the complete dish! The dish was very tasty but loaded with garlic butter, sour cream, and heaps of cheese, on top of a  heavy cole slaw. 

Here is a much healthier version that we made at home. I am sending this entry to the Kids Delight Event started by Srivalli of Spice Your Life Blog, and currently hosted on the Versatile Vegetarian Kitchen Blog, by Champa.

INGREDIENTS FOR THE FILLING
Chopped beans - 1/4 cup
Chopped carrots - 1/4 cup
Chopped onions - 1/4 cup
Chopped tomatoes - 1/4 cup
Chopped paneer - 1/4 cup
Oil - 1 tbsp
Salt - 1/2 tsp
Chilly powder - 1/4 tsp
Garam masala - 1/4 tsp
Dania powder  - 1 pinch
Jeera powder - 1 pinch
Cumin seeds - 1/4 tsp


TO PREPARE THE FILLING

1. Heat oil and add the cumin seeds.
2. When the seeds puff up add chopped onion and saute till it turns pink and transparent.
3. Add chopped beans and carrots,  stir and cover with a lid.
4. Stir now and then until the vegetables are half done.
5. Mix in chilly powder, dania powder, jeera powder and salt.
6. When the vegetables are almost done add chopped tomatoes and paneer and cook for two or three more  minutes till the tomatoes become soft but not  runny.
7. Finally add garam masala , stir well and switch off flame.
Keep the flavoursome vegetable filling aside.

INGREDIENTS FOR THE JACKET POTATOES


Potatoes - 6
Olive oil or any other vegetable oil - 1 tbsp
Salt - 1/4 tsp


TO PREPARE THE JACKET POTATOES

1. Wash and scrub potatoes, and pat them dry.
2.  Poke the potatoes all around using a fork and then cut them into halves.
3. Using a sharp knife scoop out the center portion of the halved potatoes  to  make potato cups.
( Save up the scooped out potatoes and use in other preparations .)
4. Rub the insides and out sides of  the potato cups with  little oil and salt.
5. Bake the potatoes into golden crispy cups in a preheated oven for 35 or  40 minutes  at 180`C. It may take longer if the potatoes are bigger.
6. If you use a microwave oven with grill, select  Mode 3 ( Grill and Microwave ) and cook  for 30 minutes.

TO SERVE 
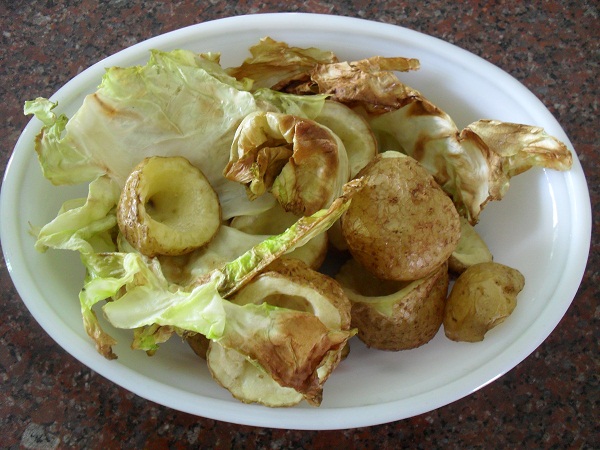
1. Grill four or five cabbage leaves until they become crisp and golden brown in colour.
2. Make a bed of cabbage leaves on the serving plate.


3. Arrange the crispy potato cups on the cabbage bed.
4. Press down a table spoon or more as required, of the vegetable filling  into the potato cups.


A platter of  Jacket Potatoes with  Mixed Vegetable Stuffing  is a  yummy and  filling meal.  Kids will enjoy it when served with  tomato sauce or ketchup.
READ MORE - Jacket Potatoes with mixed Vegetable Stuffing

Time to revive this blog!!!

Friday, March 4, 2011

Over the last 10 years, our family has grown and not just geographically! We have different cultures blending in, with siblings and cousins marrying across states and countries! Minds open up like never before, and more excitingly tastes too! Happily, every new member in the family so far has turned out to be a foodie, and that means, more flavors, more recipes and plenty more to learn and cook! In this blog we plan to publish different cuisines, veg, non-veg, vegan, grain-free, alcohol, anything and everything and in short whatever cooks in the kitchens of our extended family!
READ MORE - Time to revive this blog!!!

Photography Madness

Monday, January 26, 2009

How not to click snaps, and here is what I did not send for 'Click Red'

This is how I spent my holiday. These are samples from over a 100 snaps that I clicked yesterday. It is supposed to be a ....hmm ... lets see... ' a red chillie ikebana in an australian tequila glass?????? :-(((

Why am I posting this here? Perhaps this could be an explanation!


Well I abandoned this entire lot, and here is what I finally sent to Click Red.
READ MORE - Photography Madness

Wicked...

Tuesday, December 2, 2008


Fill a glass with ice. Pour a shot of Bacardi over. Top up with some Sprite. Add 1/4 teaspoon black salt, and one slit red chillie - with the seeds if you dare! Its exotic, wicked, and perfect for Sydney Summer!
READ MORE - Wicked...

Banana, Walnut & Love Muffins

Monday, November 24, 2008


1/2 cup oil, 1 cup brown sugar, 1 cup self raising flour, 1/2 t sodium bicarbonate, 2 over ripe bananas, a few pieces of walnuts, 1/2 cup milk. Mix everything, and bake in a muffin tray at 180 degrees (mine is a fan forced oven) for 20 minutes.... for some MUFFIN LOVE!
READ MORE - Banana, Walnut & Love Muffins

Baked Cauliflower Capsicum Milk Rice Cheese & Inspiration Casserole

Thursday, November 13, 2008

...and so it was another evening, after a looooong workday. The temptation is strong to get a take away dinner from the Indian reastaurant at the mall, where they serve not so Indian food! Changed my mind... walked to the kitchen... opened the fridge... hmm ...hmmm...
cauliflower ...maybe,
leeks ...use them soon ....
cheese.... a little maybe ,
ready made thai red curry paste .......NAAAAH!
whats the main? gotto to use the rice..

INSPIRATION ..

Burner 1
Heat 2 tbs oil
throw in 3 sliced leeks
Burner 2
heat 2 tbs butter
add 2 tbs corn flour, (gotto to mix it well before it forms lumps!)
pour in milk (if measured it could be 4 tea cups)
keep stirring, stirring, on low flame.
Burner 1
Leeks are browned
Add 1/2 the giant cauliflower broken into large florets
Add salt
Generously add hot red chillie powder (we like rocket fuel)
Masalas? No No!!!
Maybe a spec of mixed herbs...just a spec.
Burner 2
Sauce is just beginning to thicken,
add salt, add pepper.
What else??
open the masala rack, cinnamon powder? ...hmm okay. Add a pinch.
Stir, Stir ....
Burner 1
Looks like cauli will take forever to cook...could burn
Hey ..throw in a sliced capsicum.
3 sliced Tomatoes too...
Shall I add water? NO!
Cover tightly with a lid, and turn flame to low
Burner 2
Smells heavenly ..
Add cheese
Stir
Add the 3 cups of cooked rice that was set aside in the morning for dinner
Mix well.
Switch off
Burner 1
Cauli has cooked ..yeah Switch off...

....in comes hubby... "something smells terrific...."
Pick up the foil tray,
lightly coat with oil spray
Pour in the red hot chillie cauli-capsi
Pour over the milky white rice
Sprinkle pizza cheese
Sprinkle bread crumbs
will the bread crumb brown without oil? ...Spray a little oil on top.
Into the fan forced oven at 200 degrees.
Forget it for 1/2 hour ....play WII golf with hubby...

Open the oven .... oh WOW ... Heaven!!!!


READ MORE - Baked Cauliflower Capsicum Milk Rice Cheese & Inspiration Casserole

Buns

Saturday, November 8, 2008

As some of you have asked me, here's how I made the Buns in the earlier post.

Ingredients
Self Raising unbleached flour - 2.5 cups
milk - 1/2 cup
water - 1/4 cup
melted butter - 2 tbsps
dry yeast - one sachet. The cover says '7 grams (15 grams compressed)'.
1 tsp sugar
I forgot to add salt!!!

Method
1. Mix yeast with a little warm water and the sugar as set aside. Within about 5 - 6 minutes it froths.
2 Take the flour in a large bowl and make a well in the center. Add water, milk and butter and the yeast and keep stirring. Once all the dough comes together, take it out on a clean flat surface and start kneading. I kneaded for 10 minutes.
3. Cover it with cling wrap, as set aside for 1/2 hour. I left it inside the microwave as its a 'safe' place!
5. The dough would have risen by now. Punch it down, and make 8 equal sized balls. Knead each ball for about two minutes each, and arrange on a baking tray. Cover the whole lot with cling wrap and leave it aside for 1 hour.
6. I pre-heat my oven (it is fan forced) to 180 degrees centigrade for about 10 minutes.
7. Now bake the buns for 12 minutes (the top becomes a nice pale brown as shown in the picture in the post below)
8. Remove from oven immediately, and quickly coat the top of the buns with melted butter.
9. Loosely arrange the buns into a large bowl, so that they max suface area is free for aeration! (I don't have a wire rack!)

The End!
READ MORE - Buns

My First Buns!

Monday, October 27, 2008

MY FIRST BUNS.......
Okay ...it’s not like it sounds! :-))

Anyway, after a disastrous baking experience in Kolkata that ended with a command (plea?) from my husband, “Thou shalt not bake at home, what can be bought at the grocers” I did not venture again, into the bread, cakes, and cookies world.

But then, the food blogging world has happened! It seems like the whole world is baking, and successfully, by the looks of it! “Hmmm ...but then why is 'Daring Bakers' called 'daring' if it’s no big deal?” I ask myself, even as I smuggle a pack of dry yeast and a kilo of self-raising unbleached flour, into our monthly groceries.

“What’s that for?” asks my husband suspiciously eyeing the small pack of dry yeast that caught his attention. I ramble about the difference in gluten content in Kolkata wheat and Sydney wheat, and a video I saw on Bread making for Dummies, even as the cashier at Coles cheerily packed, billed, and dismissed us with a “Thank you, have a great day”.

“If you must, why don’t you just join a course at TAFE and learn the proper way?” asks Hubby weakly. “Okay” says I meekly, and a tad too fast, putting the topic to an end.

“What can TAFE teach me, that my Foodie World Power cannot?” I say to myself later, as I furiously google away. I find this simple, down-to-earth blog by Rhonda. Wow …simple living is real hard work! Anyway, some simple values rub off on me, and I make up my mind that no ‘no-knead breads’ or short cuts for me, until I first learn the ‘real’ way.

I browse over to thank Purnima - a new visitor to my blog, and here’s is what I find! Thanks Purnima! This is it! The time has finally arrived! A quick jump to Anjali's and Bee’s posts, and the yeast prayer, I begin mixing the flour at 7:16pm. My first buns are ready by 9:46pm.

Served with melted butter, and delicious home made leek and asparagus soup, even hubby gallantly admits it’s a hit.

I shalt NOT not bake at home, what can be bought at the grocers” I make a determined promise to myself!


READ MORE - My First Buns!

Mango Mania

Sunday, October 26, 2008

...and so we came back from Paddy's with more mangos than two of us could possibly eat. Inspired by Chitra Amma's Bournvita Fudge, I set out to make 'mango fudge'! I followed amma's recipe exactly ...just added crushed pulp from two mangos and some slivers of almond, instead of Bournvita. Its hard work with all the stirring, and to keep the fudge from burning. It did not become a fudge ....
but then............................................................

oooooooooh .....its such a delicious halwa!

READ MORE - Mango Mania

Ratatouille - a riot of colours

Tuesday, August 19, 2008

I had been dying to try this dish, after seeing the post on Cooked from the Heart. I followed the recipe exactly for most part. I did not have squash, and over baked it as you can see, but it still tasted glorious and juicy and ... Here are the results. It took me about 2.5 hours on a lazy Saturday evening to make this, but fully worth the time spent. This post gives detailed step by step directions with photos.


READ MORE - Ratatouille - a riot of colours

A Taste of Creativity

Sunday, July 27, 2008

Who doesn't love making the perfect dish? Not a second overcooked, not a grain of salt extra, not a single ingredient missing. As much as I would like to be the perfect cook, life always has other plans for me! What of inviting a team member home during the graveyard shift, after a 15 hour slog marathon at the office, only to find my dear hostel mates, have finished off everything cooked and uncooked in the kitchen! What of the consistent, unbreakable habit, of entering the kitchen, and then getting possessed by the desire to cook something, I saw somewhere or heard about! What of the defiance -- albeit disapproving clucking of perfectionists -- of cooking WITHOUT making that trip to the store down the street for a critical spice. What of the feeling of the gleeful triumph when the dishes turn out delicious anyway.

Necessity is the mother of all invention. Resourcefulness is divine. Creativity rules. Cooking is a high for those willing to look beyond the obvious! At this point, I must say, that this post is dedicated to some very innovative friends -Prithwis (see yantrajaal), Madhu, & Arindam! We've had many interesting discussions, debates, and experiments with teaching and learning creativity. Arindam had introduced cooking as one of the activities for the creativity workshop in our company, and the title of this post is the same as the name for his activity!

Ginger Butter Nut Squash Kozhambu made with Jahe Wangi - instant Indonesian ginger tea.

Ingredients
1 tbsp of sesame oil
a pinch of asafoetida
1/4 tsp mustard seeds
1/2 tsp urad dal (black gram)
8 - 10 curry leaves
2 dry red chillies
1/2 a butter nut squash chopped
2 tbsp of tamarind paste
2 cups of water
1 tsp Sambar Powder
Salt to taste
Mystery ingredient”: 1 sachet of Jahe Wangi - instant Indonesian Ginger Tea
Method
Heat oil. Fry mustard seeds, asafoetida, urad dal. When mustard seeds pop, and dal turns red, add the curry leaves, and broken red chillies and swish. Now tamarind paste, water, sambar powder, salt and boil. Next add the squash, and continue boiling till tender. Add a packet of the tea and boil for few more minutes. Add a little water to desired consistency, as the kozambu should not be very thick like a paste, and neither watery. Serve this with hot cooked white rice and a dollop of ghee!
The first time I made this at our hostel, I added a piece of til chikki (sesame toffee), instead of instant ginger tea! We'd buy these chikkis while walking home from the office for a rupee, from the potti kadai (literally means 'box-shop’ or a small shop the size of a box). The traditional recipe called for sesame, and jaggery, and I had neither. There was no point buying these ingredients either, as they were not used in everyday cooking at the hostel. It’s fun and now become a hobby to keep looking for substitutes for the mystery ingredient. Just one small ingredient changed, resulted in many varied flavors and varieties of gojjus and tamarind kozambus. Luckily most have been tasty, and very few failures (don’t try adding chewing gum!)

By the way on that fateful grave yard shift episode - my colleague and I relished bread pizzas with a topping of besan . Read, nothing more than a hastily stirred besan (gram flour) paste with salt and pepper :-(. Since my kind hostel mates had even finished off the last crystal of sugar in the kitchen, I landed up making sweet lassi with Glaxo’s glucose powder from my trekking kit in the rucksack! I think we were too tired and hungry to care, but my colleague insists that it was "not bad at all and in fact quiet delicious" !
READ MORE - A Taste of Creativity